

Step 1: Install the Action
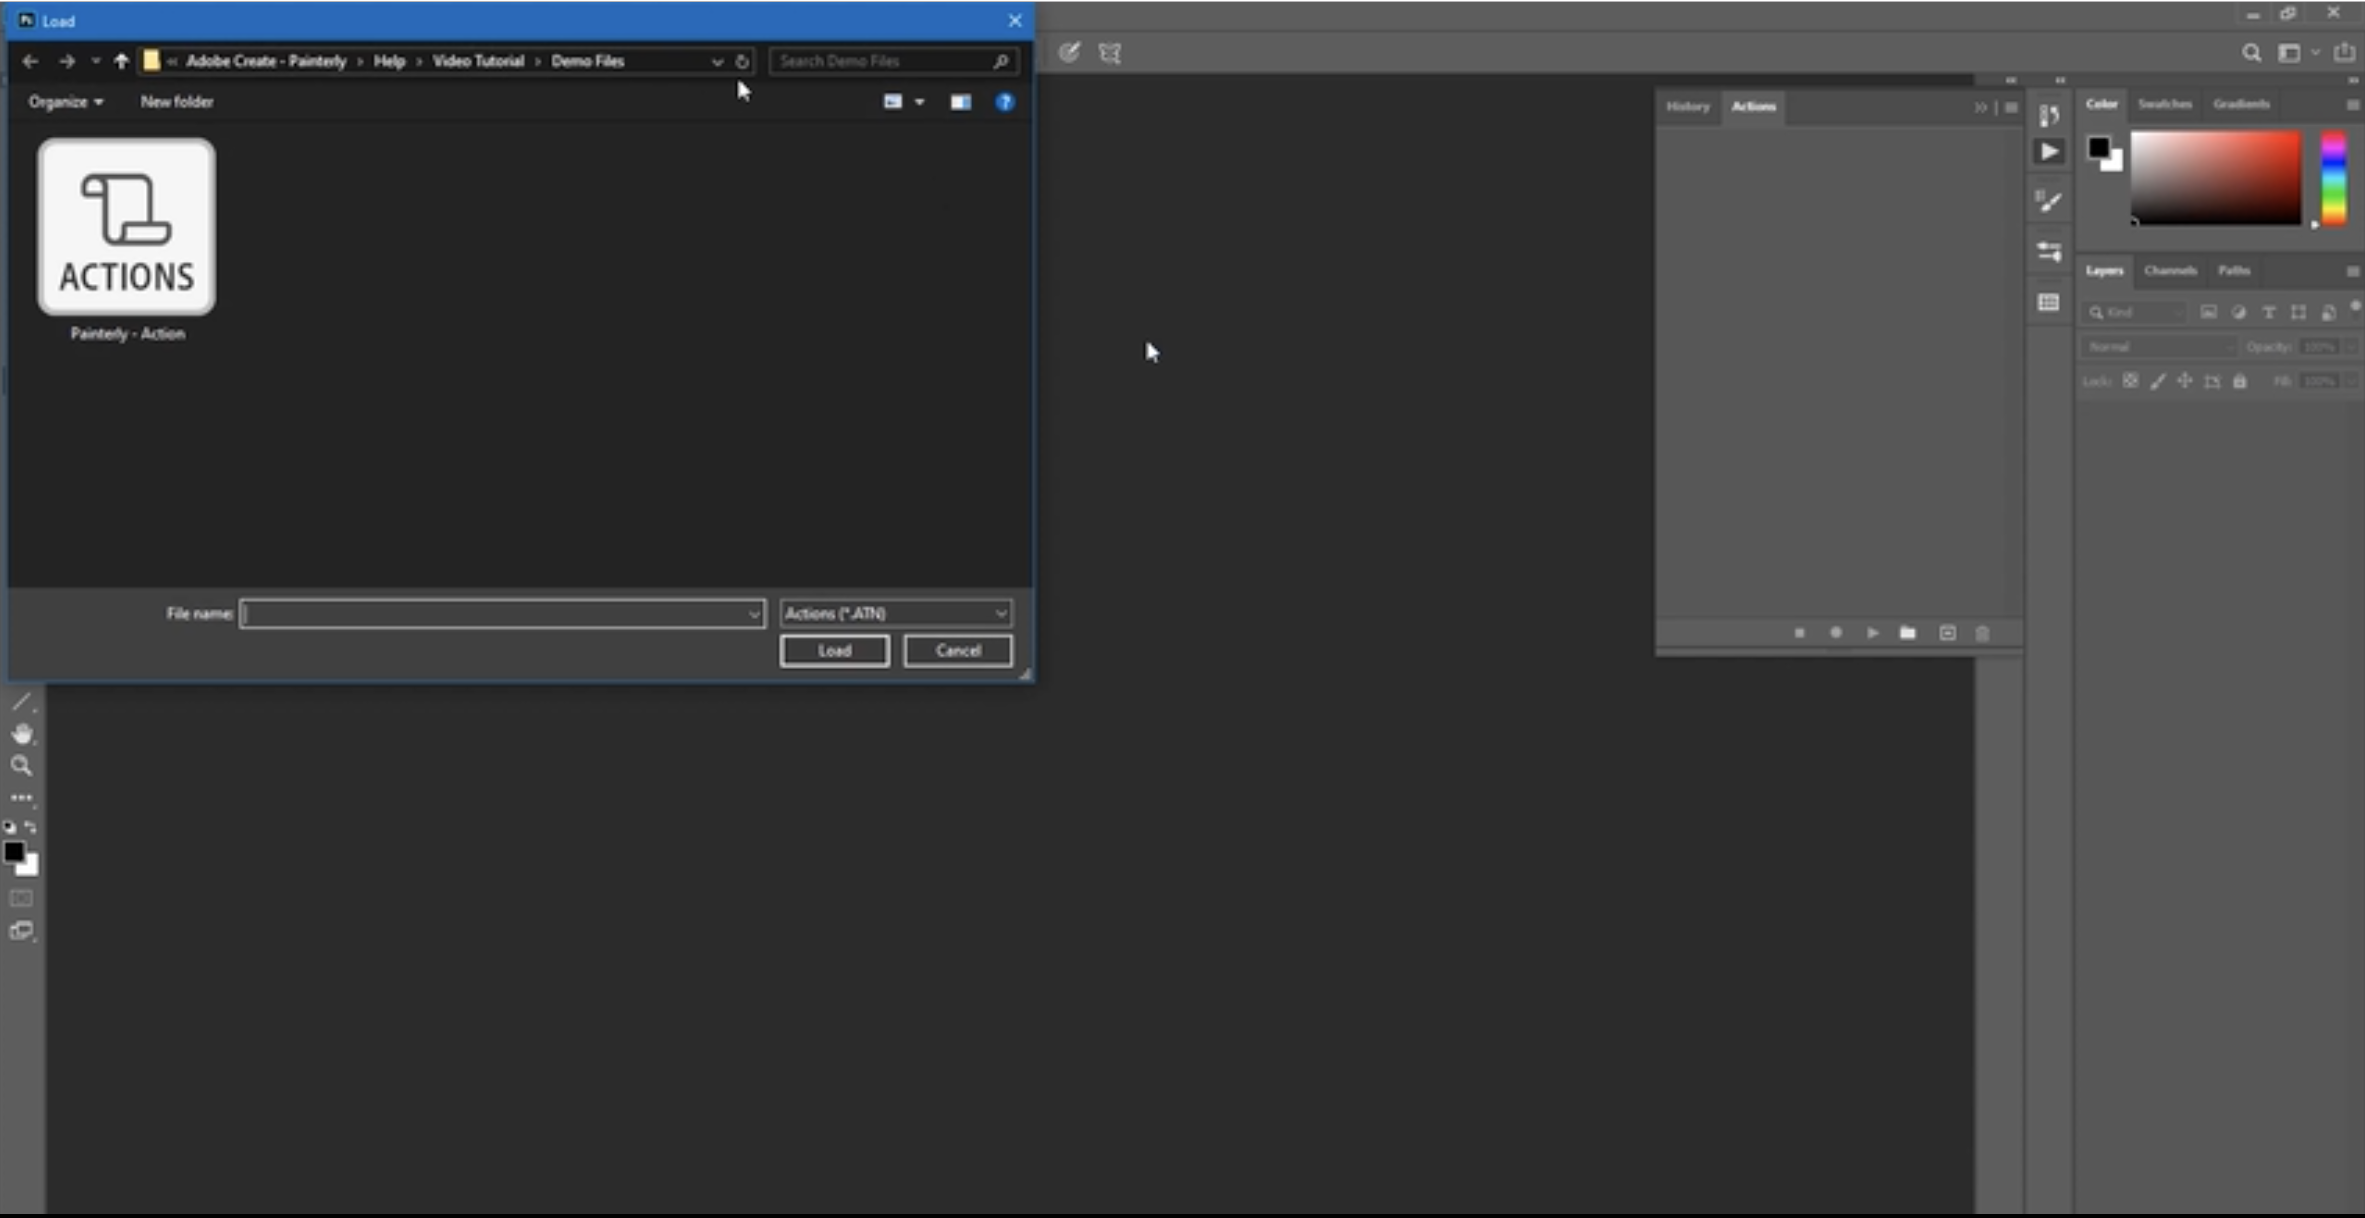
1. Open Photoshop’s Actions panel (Window > Actions). Click the menu icon in the panel’s top right corner, select Load Action, and select the file Painterly – Action from your hard drive.
2. Open the Brushes panel (Windows > Brushes). In this panel, click the menu icon at the top right corner; then select Import Brushes and select the file Painterly – Brushes.
3. In Photoshop CC 2020, open the Patterns panel (Windows > Patterns). In this panel, click the menu icon at the top right corner, select Import Patterns, and choose the file Painterly – Patterns. In previous versions of Photoshop, to install the patterns file, go to menu Edit > Presets > Presets Manager. In this panel, select Patterns as Preset Type, click Load, and select the file Painterly – Patterns.
Step 2: Prepare Your Image
1. Select the Brush tool, and then open the Brush Settings panel (Window > Brush Settings). Select this panel’s menu icon (in the top right corner) and select Reset All Locked Settings. Then select the Art History Brush tool (not the History Brush tool, which it is grouped with in the tooldbar) from the toolbar and also reset the settings for this tool in the Brush Settings panel.
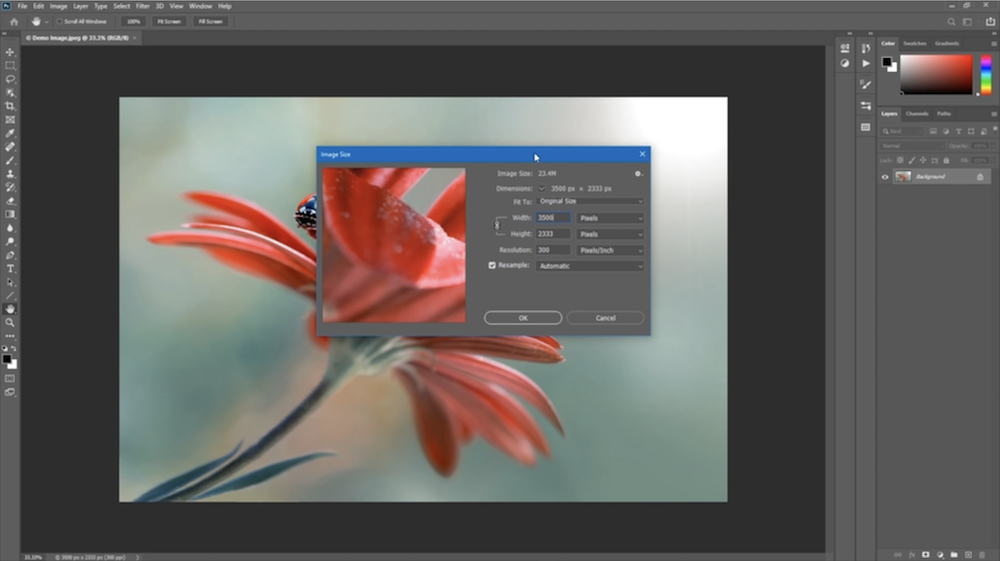
2. The action was tested on images as large as 5,000 pixels—make sure that your image’s Width and Height parameters are not more than 5,000 pixels, and make sure that these parameters are not too low. Working on a low-resolution image will make the final effect less detailed; a good resolution to work with is near 3,000 or 3,500 pixels.
Also choose an image that is well lit and that does not have large areas of white or black; the action also needs some details to work with—for instance, it won’t work if it’s just applied to a gradient.
3. For Photoshop versions previous to CC 2018: In the latest versions of Photoshop (CC 2018, CC 2019, and CC 2020), there’s no need to check the following options. But if you’re using an earlier version, also check these settings:
Select the Brush tool and make sure that in the top options bar, the parameters are as follows:
- Mode is set to Normal.
- Opacity and Flow are both set to 100%
- The option Always Use Pressure For Size is off.
Select the Art History Brush and make sure that in the top options bar, the parameters are as follows:
- Mode is set to Normal.
- Opacity is set to 100%.
- Style is set to Dab.
- Area, Tolerance, and Angle are set to zero.
- Always Use Pressure For Opacity and Always Use Pressure For Size are both set to off.
Step 3: Run the Action
1. Before applying the effect make sure that the file contains just the layer with the image on it. Open the Actions panel, select the PAINTERLY action, and click the play icon. The playback time can vary depending on several factors; for a 3,000-pixel image, it should be around two minutes.
When the playback finishes, the message “Render Completed” will appear; click Continue to close the message.
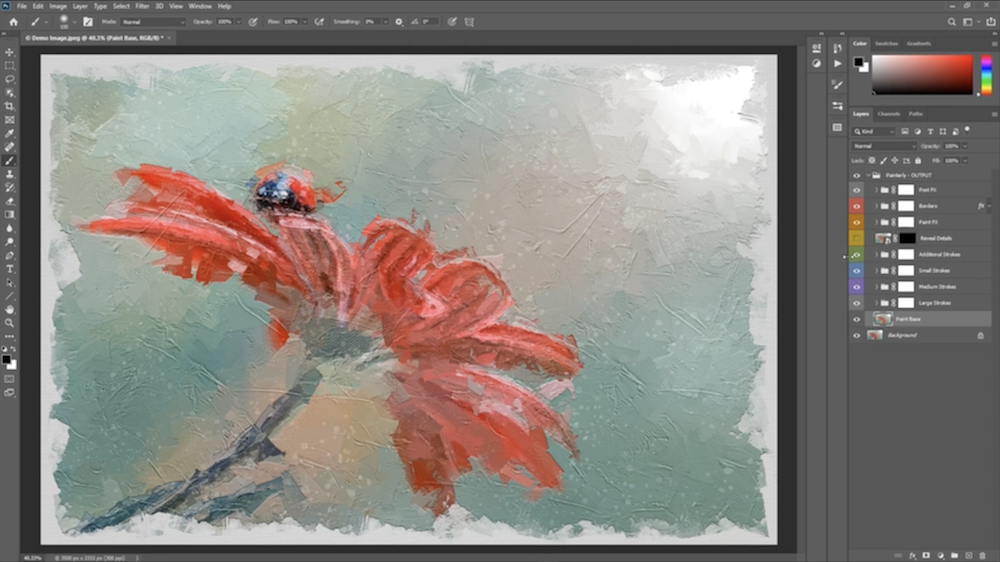
2. Inside the Painterly – OUTPUT group, there are few subgroups and layers:
- Post FX
- Borders
- Paint FX
- Reveal Details
- Additional Strokes
- Small Strokes
- Medium Strokes
- Large Strokes
- Paint Base
To see what each group does, hide them one by one, starting from the top.
The structure of the layers is easy to understand; there is a base (Paint Base), and above that are four groups of strokes that are increasingly detailed, going toward the top. The group Paint FX then applies some textures on top of these painted layers. Borders, as the name suggests, creates a border to simulate an unfinished painting. And Post FX gives a final touch of color correction.
Step 4: Customize Your Image
1. Reveal Details is usually the best layer to start customization from. After playback, the mask channel of this layer is selected by default, along with the Painterly – Basic Brush.
Since its mask channel is black, this layer is totally hidden; paint on the canvas with white to lessen the effect on parts of your image that need to be more finely detailed—for instance, the subject’s eyes, or any other element that should be more in focus.
You can paint with black to reapply the effect.
Make sure that the mask channel is selected while painting. This layer is a smart object, and if you try to paint on it directly, an error message will appear. If you get this error message, click OK, select the mask channel, and continue painting.
2. The Paint Base layer is used just as a base and can stay untouched.
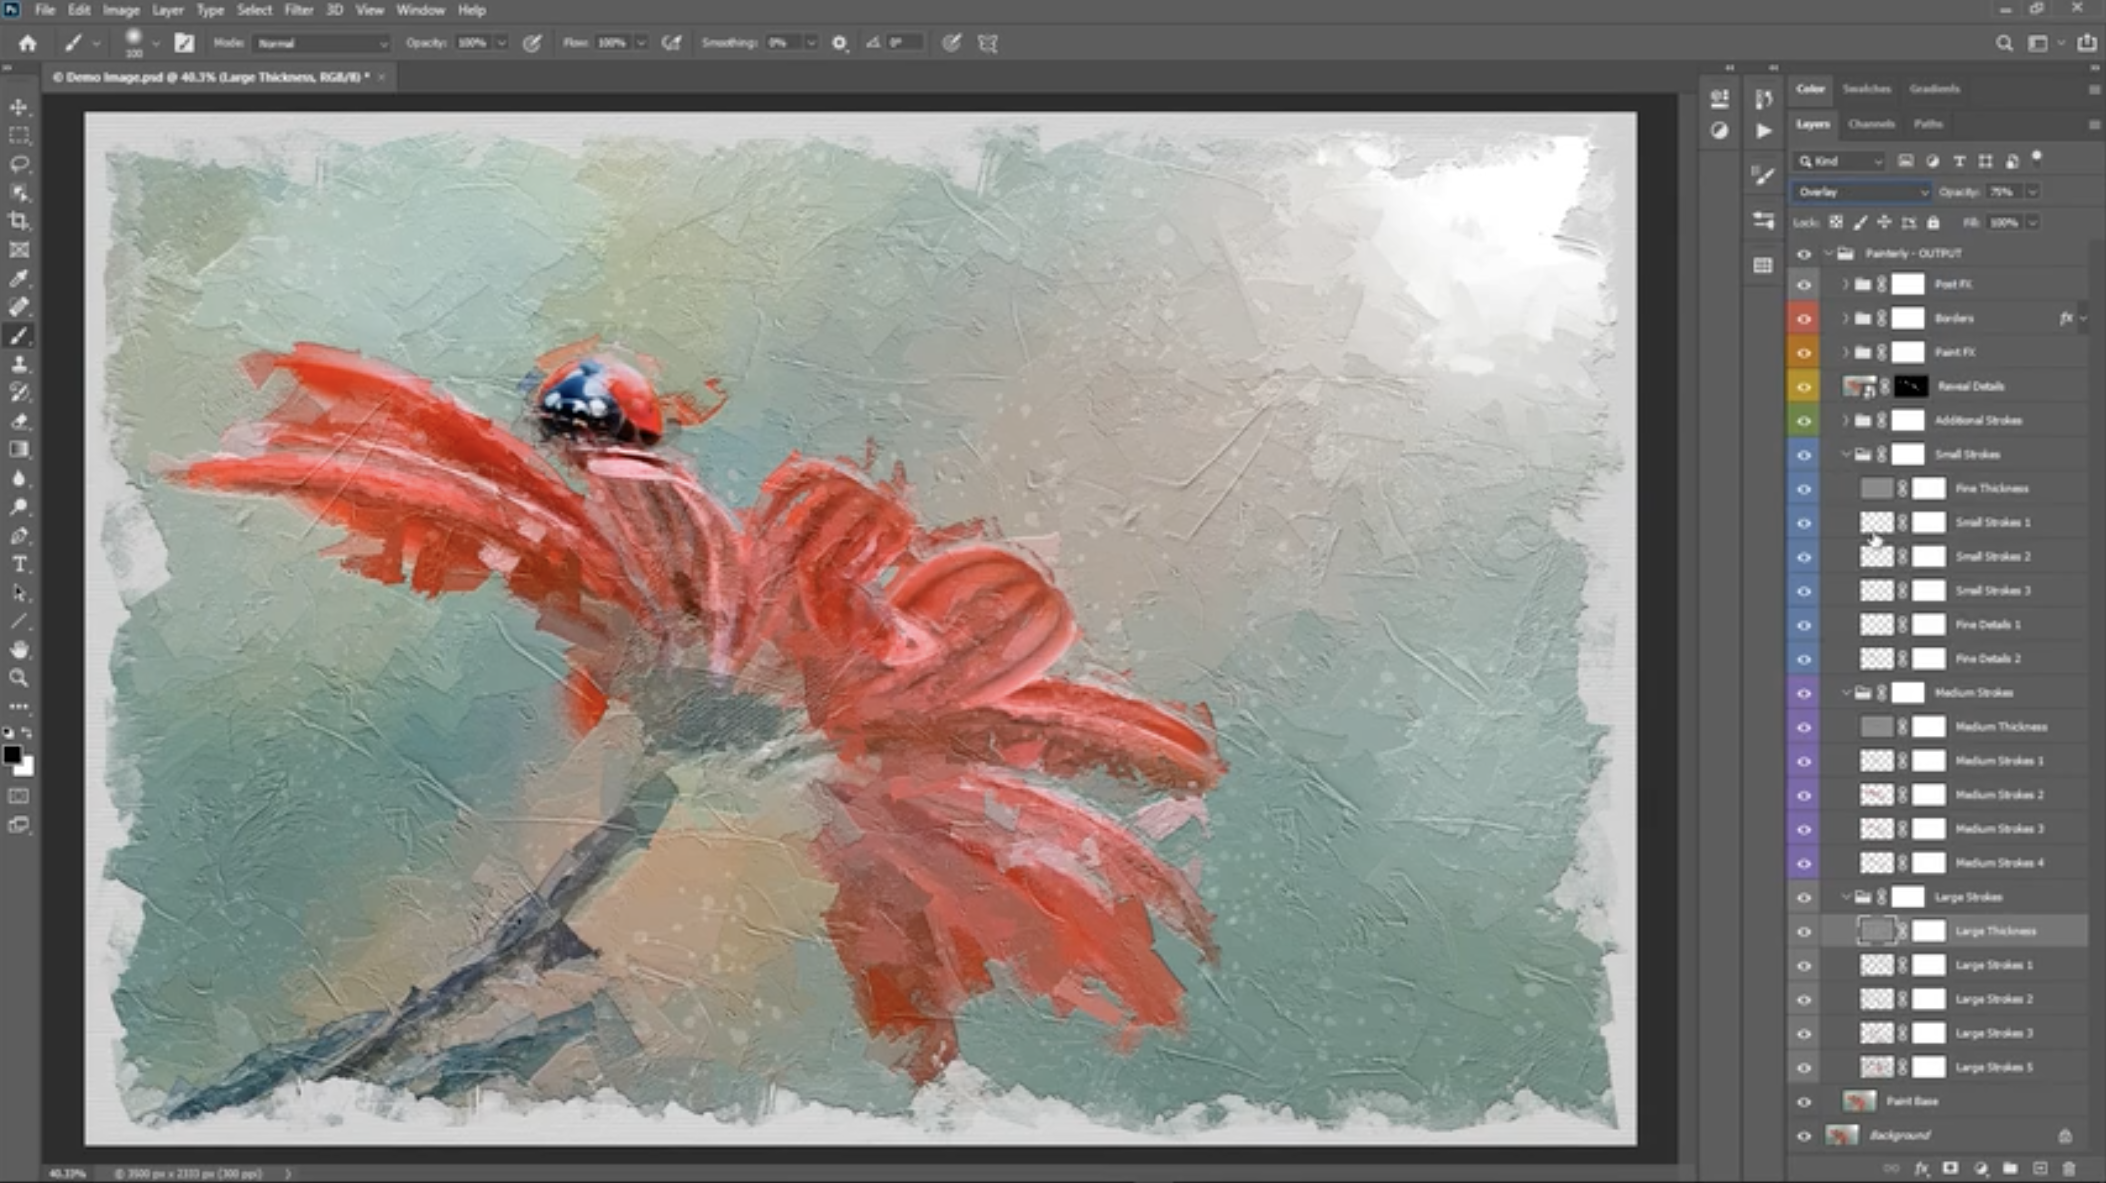
3. The Large, Medium, and Small Strokes groups have the same structure; each one contains some brush strokes and, at the top, a Thickness layer. You can hide some stroke layers or even a whole set in the Medium and Small groups to make the painted effect look less detailed and more abstract.
As for the three thickness layers, change their opacity to control their visibility. To make a very strong thickness effect, you can also duplicate one of these layers by selecting it and pressing ctrl-J or command-J. Try also experimenting with other blending modes of the same category of Overlay (Soft Light, Hard light, and Linear Light).
4. The Additional Strokes group contains three sets of optional strokes; unhide them individually to see how they affect your image, and choose your favorite combination. Try them also with other blending modes and different settings of opacity.
5. The first thing you’ll notice when opening the Paint FX group is that all the layer styles inside of it are expanded. To quickly organize it, hold the alt key or option key (on a Mac), and close the group; then release the key. When you open the group again, all the layers inside will be organized. Watch the video (or read the guide in the action download folder) to learn more about this group.
6. The Borders group contains five borders that will simulate an unfinished painting. Starting from the top, Border 1 is the thinnest and Border 5 is the thickest. If you want the whole painting to be visible, hide this group.
If there’s a certain combination of borders that works well with your image, but it’s covering an area of it that should be visible, select the mask channel of the group Borders and paint with black on the part of the border that you want to remove. You can use one of the three Manual brushes for this process; these are among the first in the Painterly brushes set.
Also notice that the group Borders has two layer styles, Bevel & Emboss adds a thickness effect to the whole painted area, and Color Overlay is hidden by default. You can activate Color Overlay to make the area of the canvas colored; double-click this layer style to change the color.
7. The layers in the Post FX group will add the final touches to the image.
Spotlight creates both a light and a vignette effect; change the opacity parameter to control its intensity. This layer is made using a Gradient Fill; double-click the thumbnail to edit its properties. From the Gradient Fill panel, you can change the position of the spotlight by dragging it on the canvas.
Change the opacity of the layer Contrast to increase or decrease the contrast of the final effect.
The layers Levels and Hue/Saturation are two simple adjustment layers that can be edited by double-clicking their thumbnail.
The last two layers Color Tint and Color Tone can be used, respectively, to add a tint or tone to the final effect. Double-click their thumbnails to change the color, and use their opacity to tone them down if needed.


Mateo Cortez –
An all-in-one platform for all your graphic needs.
Zoe Martin –
Perfect for finding inspiration for your next graphic projects.
James O’Connor –
A secure shopping experience with protected and reliable transactions.
Alexander Petrov –
Responsive site, fantastic to navigate both on desktop and mobile.
James Miller –
I recently tried the Painterly Action and was really impressed with the results. It gave my photos a unique, artistic touch that I hadn’t achieved before, and the process was surprisingly straightforward. It’s a great tool for anyone looking to add a bit of creativity to their images without a steep learning curve.
Andrea Moretti –
Ho provato “Painterly Action” e sono rimasto colpito dai risultati. È davvero facile da usare e riesce a dare un tocco artistico alle mie foto senza complicazioni. Consiglio di provarlo a chi cerca un modo semplice per trasformare le proprie immagini.
Emma Bernard –
J’ai testé Painterly Action et je dois dire que l’expérience est vraiment agréable. Les résultats sont impressionnants et donnent un effet artistique à mes photos sans trop de retouche. La facilité d’utilisation rend le traitement vraiment rapide, ce qui est un plus pour mes projets.
Paolo Galli –
Painterly Action è stato davvero utile per dare un tocco artistico alle mie foto. È semplice da usare e il risultato finale è sempre soddisfacente. Lo consiglio a chi cerca un modo veloce per rendere le proprie immagini più interessanti senza complicarsi troppo la vita.
Matheus Costa –
I recently used the Painterly Action for my photos, and I was really impressed with the results. It added a beautiful, artistic touch that brought out the colors without looking overdone. The process was straightforward, making it easy to enhance my images in just a few clicks.
Marco Rossi –
Painterly Action offre un modo interessante per trasformare le foto in opere d’arte. È facile da usare e le mie immagini hanno guadagnato un tocco creativo che non avrei mai immaginato. Perfetto per chi cerca di dare un nuovo stile alle proprie fotografie senza complicarsi troppo la vita.
Adrien Pelletier –
J’ai utilisé Painterly Action pour donner un effet artistique à mes photos, et je dois dire que le résultat est vraiment satisfaisant. L’application est facile à utiliser et les ajustements se font rapidement, ce qui fait gagner du temps. C’est un excellent outil pour ceux qui veulent ajouter une touche créative à leurs images sans se compliquer la vie.
Francesca Rinaldi –
“Painterly Action” è davvero un ottimo strumento per chi ama dare un tocco artistico alle proprie foto. La facilità d’uso rende il processo creativo molto fluido, e il risultato finale è sempre sorprendente. È perfetto per chi vuole sperimentare senza complicarsi troppo la vita.
Sara Conti –
Ho provato “Painterly Action” e devo dire che rende il lavoro di editing fotografico molto più semplice e divertente. Le modifiche sono rapide e il risultato finale ha un bel tocco artistico. È perfetto per chi cerca di dare un nuovo stile alle proprie foto senza complicarsi troppo la vita.
Chiara De Angelis –
“Painterly Action” ha davvero semplificato il mio processo creativo. Le sue funzionalità consentono di ottenere risultati interessanti in pochi passaggi, rendendo il lavoro con le immagini molto più divertente. È perfetto per chi vuole dare un tocco artistico senza complicarsi troppo la vita.
Ana Pereira –
I recently tried the Painterly Action, and it’s been a game changer for my editing process. It really enhances photos with a beautiful, artistic touch without making them look overly processed. I appreciate how easy it is to apply, making my workflow much smoother.
Elena Morales –
I recently tried the Painterly Action, and it really transformed my photos into beautiful, artistic pieces. The process was straightforward, and I loved how easy it was to achieve that painterly effect without needing a lot of editing skills. It’s perfect for anyone looking to add a creative touch to their images quickly.
Louis Martin –
J’ai utilisé le Painterly Action et je suis vraiment satisfait du résultat. Les effets appliqués donnent une touche artistique aux photos tout en restant naturels. L’application est simple, ce qui permet de gagner du temps tout en améliorant la qualité visuelle des images.
Matteo Lombardi –
Ho provato “Painterly Action” e sono rimasto colpito dalla facilità con cui riesce a trasformare le mie foto in immagini dallo stile pittorico. È un’ottima risorsa per chi cerca un tocco artistico senza complicarsi la vita. Consiglio di provarlo per dare una nuova vita ai propri scatti.
Sara Conti –
Painterly Action è davvero un ottimo strumento per chi ama dare un tocco artistico alle proprie foto. La facilità d’uso è sorprendente e i risultati sono sempre soddisfacenti. Ho apprezzato molto come riesca a trasformare immagini in modo creativo senza richiedere una grande esperienza.
Chloé Laurent –
« Painterly Action » est un excellent outil pour ceux qui cherchent à transformer leurs photos en œuvres d’art. L’application est facile à utiliser et offre des résultats impressionnants en quelques clics. J’apprécie particulièrement la variété de styles proposés, qui permettent de personnaliser chaque image selon ses préférences.
Christopher Young –
I recently tried the Painterly Action and was really impressed with the results. It effortlessly transformed my photos into beautiful, artistic pieces without a lot of hassle. I appreciate how easy it is to use, making it perfect for anyone looking to add a creative touch to their work.
Elena Ricci –
Ho provato “Painterly Action” e sono rimasto colpito dalla facilità con cui riesco a trasformare le mie foto in opere d’arte. L’interfaccia è intuitiva e i risultati sono davvero soddisfacenti. È perfetto per chi vuole dare un tocco creativo senza complicarsi troppo la vita.
Paolo Galli –
Ho provato “Painterly Action” e devo dire che è stato un ottimo strumento per dare un tocco artistico alle mie foto. La facilità d’uso è sorprendente, anche per chi non è un esperto. Le trasformazioni sono davvero belle e rendono le immagini più interessanti.
Andrea Moretti –
Ho provato “Painterly Action” e devo dire che è stato davvero utile per dare un tocco artistico alle mie foto. L’applicazione è semplice da usare e i risultati sono sorprendenti, trasformando anche scatti normali in opere d’arte. Mi ha fatto risparmiare tempo e ha reso il mio lavoro di editing molto più divertente.
William Wilson –
Painterly Action really transformed my photos into stunning, artistic images in just a few clicks. The results were impressive and added a unique touch to my social media posts. It was easy to use, which made the editing process fun rather than frustrating.